Instrumenting Adobe Reader with Frida
Table of Contents
Frida is an open-source dynamic instrumentation toolkit that has become popular in recent years, and its use in mobile security is especially prevalent.
In this post, I would like to provide a general introduction to the tool and show some examples of how it can also be used on the Windows platform.
Installing Frida
Installing the tool is very simple and can be done using the Python package manager, pip.
After confirming that Python and pip are already on your system, you can install Frida with the command below:
$ pip install frida-tools
Tip: If you run into an error on Windows, try
pip install wheelfirst before re-running the command
And to verify you have Frida correctly installed, you can type import frida in the Python REPL and no error message should be thrown:

Function Hooking
One of the most basic feature of Frida is the ability to hook function calls in a running process.
To test this out, we can play with Adobe Acrobat Reader and try to intercept all the Javascript console outputs. (Examples here use offsets from Adobe Acrobat version 2020.012.20043 and may not be valid in other versions.)
To do this, we can create a new script:
import frida
import sys

def main(target_process):
  session = frida.attach(target_process)

  print("[!] Ctrl+D on UNIX, Ctrl+Z on Windows/cmd.exe to detach from instrumented program.\n\n")
  sys.stdin.read()
  session.detach()


if __name__ == '__main__':
  if len(sys.argv) != 2:
    print("Usage: %s <process name or PID>" % __file__)
    sys.exit(1)

  try:
    target_process = int(sys.argv[1])
  except ValueError:
    target_process = sys.argv[1]
  main(target_process)
So far, all we have are standard boilerplate code that takes in a PID or process name through the second argument and attaches to that process using Frida.
Now to make the script to perform actions, we need to inject some Javascript code:
# --- new code ---
def on_message(message, data):
  print("[%s] => %s" % (message, data))
# --- new code ---

def main(target_process):
  session = frida.attach(target_process)

  # --- new code ---
  script = session.create_script('''

    var EScript_base = Module.findBaseAddress('EScript.api');
    console.log('EScript.api baseAddr: ' + EScript_base);

    var print2console_addr = EScript_base.add(ptr('0x824c7'));

    function getCASText(addr) {
      if (addr.isNull())
          return '';
      return addr.add(4).readPointer().readUtf16String();
    }

    Interceptor.attach(print2console_addr, {
      onEnter: function(args) {
        console.log('');
        console.log('[+] Called console.print ' + print2console_addr);
        var text = getCASText(args[0]);
        console.log(text);
      }
    });
  ''')
  script.on('message', on_message)
  script.load()
  # --- new code ---

  print("[!] Ctrl+D on UNIX, Ctrl+Z on Windows/cmd.exe to detach from instrumented program.\n\n")
  sys.stdin.read()
  session.detach()

...
Frida Architecture
Now is a good time to introduce a bit about the Frida architecture and talk about why we are adding Javascript in our Python script:
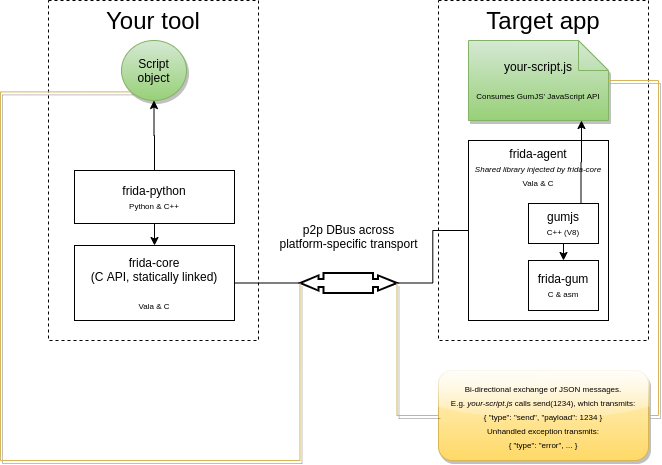
As demonstrated by the diagram above, Frida mainly consists of two parts. On the one hand, there’s the Python code that runs in its own standalone process and communicates with the frida-core through a layer of bindings (frida-python in this case, although frida-node, frida-swift, etc also exist). On the other hand, we have a frida-agent that is directly injected into the target process (Adobe Acrobat in our case) and executes Javascript on demand.
The changes we made above basically sends the Javascript code to the frida-agent and allows it to run inside the target process, and the on_message handler opens up a way for the Javascript component to send data back to our tool process.
Frida Javascript API
After looking at the theories, we can now focus on the Javascript APIs that we are using. These APIs are very well documented on the Frida website and I highly recommend you bookmark this page when working with Frida.
This is the same Javascript that is embedded in the Python script above, duplicated here for reference:
var EScript_base = Module.findBaseAddress('EScript.api');
console.log('EScript.api baseAddr: ' + EScript_base);

// hard-coded function offset obtained through reverse engineering
var print2console_addr = EScript_base.add(ptr('0x824c7'));

function getCASText(addr) {
  if (addr.isNull())
      return '';
  return addr.add(4).readPointer().readUtf16String();
}

Interceptor.attach(print2console_addr, {
  onEnter: function(args) {
    console.log('');
    console.log('[+] Called console.print ' + print2console_addr);
    var text = getCASText(args[0]);
    console.log(text);
  }
});
Module.findBaseAddress(name)returns the base address of thenamemodule- all Frida pointers are immutable and can be operated on using
.add,.sub, etc .readPointerand.readUtf16Stringare both examples of how Frida native pointers can be dereferenced. Other methods also include.readByteArray,.readU8, and more.Interceptor.attach(target, callbacks[, data])intercepts calls to function attarget. Two callbacks can be specifiedonEnter: function (args): andonLeave: function (retval).
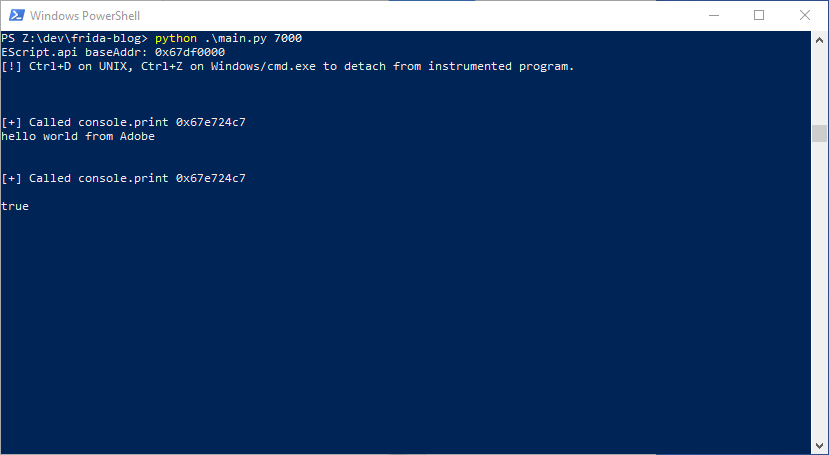
Now, with the code in place, we can successfully intercept all the Javascript console outputs as shown below:
Memory Allocation and Parameter Manipulation
Besides just observing function calls, we can also manipulate them.
As an example, we can try to hook the Javascript evaluation function and change the code that will be run (again, you may need to find your own offset):
var EScript_base = Module.findBaseAddress('EScript.api');
console.log('EScript.api baseAddr: ' + EScript_base);
var eval_func_addr = EScript_base.add(ptr('0x7f3eb')); // function offset

function getUTF16String(addr) {
  var end = addr;
  while (end.readU16() !== 0) end = end.add(2);
  var size = end.sub(addr).toInt32();
  console.log("size: "+size);
  var buf = addr.add(2).readByteArray(size-2);
  buf = new Uint16Array(buf);
  console.log(buf);

  var out = '';
  for (var i = 0; i < (size-2)/2; i++) {
    var c = ((buf[i]&0xff)<<8)+(buf[i]>>8);
    out += String.fromCharCode(c);
  }
  return out;
}

function createUTF16String(str) {
  var size = str.length*2 + 4+4;
  var buf = Memory.alloc(size);
  var ret = buf;
  buf.writeU8(0xfe); buf = buf.add(1);
  buf.writeU8(0xff); buf = buf.add(1);

  for (var i = 0; i < str.length; i++) {
    var c = str.charCodeAt(i);
    buf.writeU8(c>>8); buf = buf.add(1);
    buf.writeU8(c&0xff); buf = buf.add(1);
  }
  buf.writeU16(0); buf = buf.add(2);
  buf.writeU16(0); buf = buf.add(2);
  buf.writeU16(0); buf = buf.add(2);

  return ret;
}

Interceptor.attach(eval_func_addr, {
  onEnter: function(args) {
    console.log('');
    console.log('[+] Called eval func ' + eval_func_addr);
    var code = getUTF16String(args[0])
    console.log('Old code: '+code);
    var new_code = createUTF16String(code.replace('Adobe', 'Frida'));
    this.new_code = new_code;
    args[0] = new_code;
  }
});
The Python wrapper code was not modified, so it will not be shown here.
Because Adobe uses big endian UTF16 here, we need to implement our own encoding and decoding function. Some noteworthy points to comment upon include:
Memory.alloc(size)allocatessizebytes of memory on the heap for you and returns a pointer to that bufferthis.new_code = new_code;this line here is necessary because all Frida allocated buffers are automatically freed when there’s no longer a js pointer to it. You can check out the Best Practices article for more info.- For every
.readU8,.readPointer, etc, there exists a write version of it. - The
argsvariable can be edited to manipulate function parameters.on using
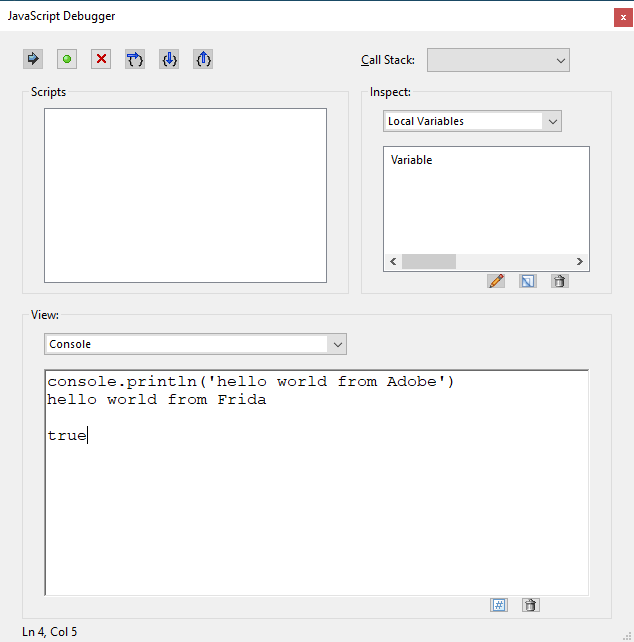
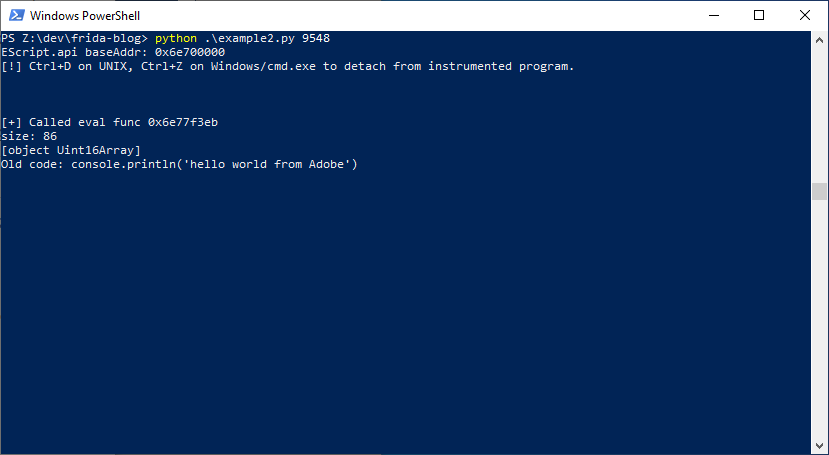
Here is the code above in action where every word “Adobe” is replaced with “Frida” before execution:
Cross Process Messaging and A Practical Example
After looking at the basics, we can take a look at more practical and complex example that involves sending data back to the Python code. In this case, we are going to hook the argument parsing function used by Adobe Javascript builtins called ESArgParse, implement a parsing logic for the internal structure, and send the result back to the Python code.
Let’s start with the Javascript component:
var EScript_base = Module.findBaseAddress('EScript.api');
console.log('EScript.api baseAddr: ' + EScript_base);

var ESArgParse_addr = EScript_base.add(ptr('0x55f20')); // function offset


Interceptor.attach(ESArgParse_addr, {
  onEnter: function(args) {
    console.log('');
    console.log('[+] Called ESArgParse ' + ESArgParse_addr);
    var struct = parseParamStruct(args[0]);
    console.log(struct);
    send(struct);
  }
});

function parseParamStruct(addr) {
  var out = [];
  while(!addr.readPointer().isNull()) {

    var paramName = addr.readPointer().readCString();
    var paramType = addr.add(4).readU32();
    var isOptional = addr.add(8).readU32();
    var resultPtr = addr.add(12).readU32();
    var emptyField = addr.add(16).readU32();

    out.push([paramName, paramType, isOptional, resultPtr, emptyField]);
    addr = addr.add(5*4);
  }
  return out;
}
As you can see, the first parameter of the ESArgParse is a pointer to a struct that stores information about how to process the arguments. By implementing parseParamStruct we are able to extract useful information such as the name, type, etc about each parameter.
Note how the send function is used to phone back to the Python code and pass along the extracted data.
Now, let’s look at the Python code:
import frida
import sys

def get_type(v):
  return ['boolean', 'number', 'object', 'string', 'unknown', 'value', 'string'][v] if v <= 6 else 'unknown'

def on_message(message, data):
  print("[%s] => %s" % (message, data))
  if message['payload']:
    for param in message['payload']:
      print('parameter {:10} has type {:6}, is {:8}, and should be stored at {:8}'.format(
          param[0], get_type(param[1]), 'required' if param[2] == 0 else 'optional', hex(param[3])))

def main(target_process):
  session = frida.attach(target_process)

  script = session.create_script('''
	..
  	CODE FROM ABOVE
	..
  ''')
  script.on('message', on_message)
  script.load()
  print("[!] Ctrl+D on UNIX, Ctrl+Z on Windows/cmd.exe to detach from instrumented program.\n\n")
  sys.stdin.read()
  session.detach()


if __name__ == '__main__':
  if len(sys.argv) != 2:
    print("Usage: %s <process name or PID>" % __file__)
    sys.exit(1)

  try:
    target_process = int(sys.argv[1])
  except ValueError:
    target_process = sys.argv[1]
  main(target_process)
What’s different this time is that we are accessing the message['payload'] property with in the on_message handler. Conveniently Frida is able to take care of the Javascript object to Python object conversion and we can directly access the data that we just sent over from the Javascript side.
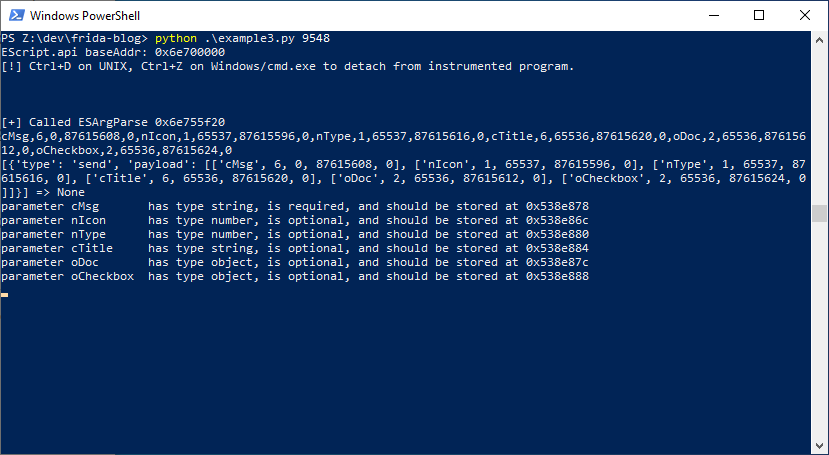
If we run the code and execute app.alert('hi') in the console, this is what we get:
Function Tracing and Frida Stalker
In addition to the basic features, Frida also has a powerful code tracing engine, similar to DynamoRIO and Pin, called Stalker that is capable of capturing every function, block, and even instruction which is executed and has support for dynamic code recompilation. What’s special about Stalker is both the inclusion of a Javascript binding that allows us to program our logic in a high level language and the ability to fall back to low-level C code at parts that require performance by using CModules. Some good resources to get started with Stalker include this amazing overview and the official Frida documentation.
Because Stalker is a very huge topic in itself, we will only go over a simple example and leave out some of the advanced features in this post. Just for fun, let’s work off of the last example and see what are the functions that are being called by ESArgParse:
var EScript_base = Module.findBaseAddress('EScript.api');
console.log('EScript.api baseAddr: ' + EScript_base);

var ESArgParse_addr = EScript_base.add(ptr('0x55f20')); // function offset

Interceptor.attach(ESArgParse_addr, {
  onEnter: function(args) {
    console.log('');
    console.log('[+] Called ESArgParse ' + ESArgParse_addr);
    var struct = parseParamStruct(args[0]);

    send(struct);
    Stalker.follow({
      events: {
        call: true, // we are only interested in function calls
        ret: false,
        exec: false,
        block: false,
        compile: false
      },
      onReceive: function (events) {
        var calls = Stalker.parse(events, {
          annotate: true, // to display the type of event
        });

        // print nested callstack
        for (var i = 0; i < calls.length; i++) {
          var call = calls[i];
          if (call[0] !== 'call') break;

          console.log((' '.repeat(call[3]*2))+'↳ calling '+call[2]);
        }
      },
    })

  },
  onLeave: function(ret_val) {
    Stalker.unfollow();
  }
});

function parseParamStruct(addr) {
  var out = [];
  while(!addr.readPointer().isNull()) {

    var paramName = addr.readPointer().readCString();
    var paramType = addr.add(4).readU32();
    var a = addr.add(8).readU32();
    var b = addr.add(12).readU32();
    var c = addr.add(16).readU32();

    out.push([paramName, paramType, a, b, c]);
    addr = addr.add(5*4);
  }
  return out;
}
As you can see, we are now calling some new methods from the Stalker builtin. Some interesting points to mention include:
-
the Stalker can be enabled or disabled at any time through the use of
Stalker.followandStalker.unfollow. This helps keep the performance impact of the tracer to a minimum. -
Because the API is first designed for the C language, the
eventsargument of theonReceivecallback is in binary format and has to be parsed usingStalker.parse. -
Various events have different structures and can be referenced in gumevent.h
struct _GumCallEvent
{
  GumEventType type;

  gpointer location;
  gpointer target;
  gint depth;
};
This is the structure of a call event. We used both the
targetanddepthfield in the Javascript code above
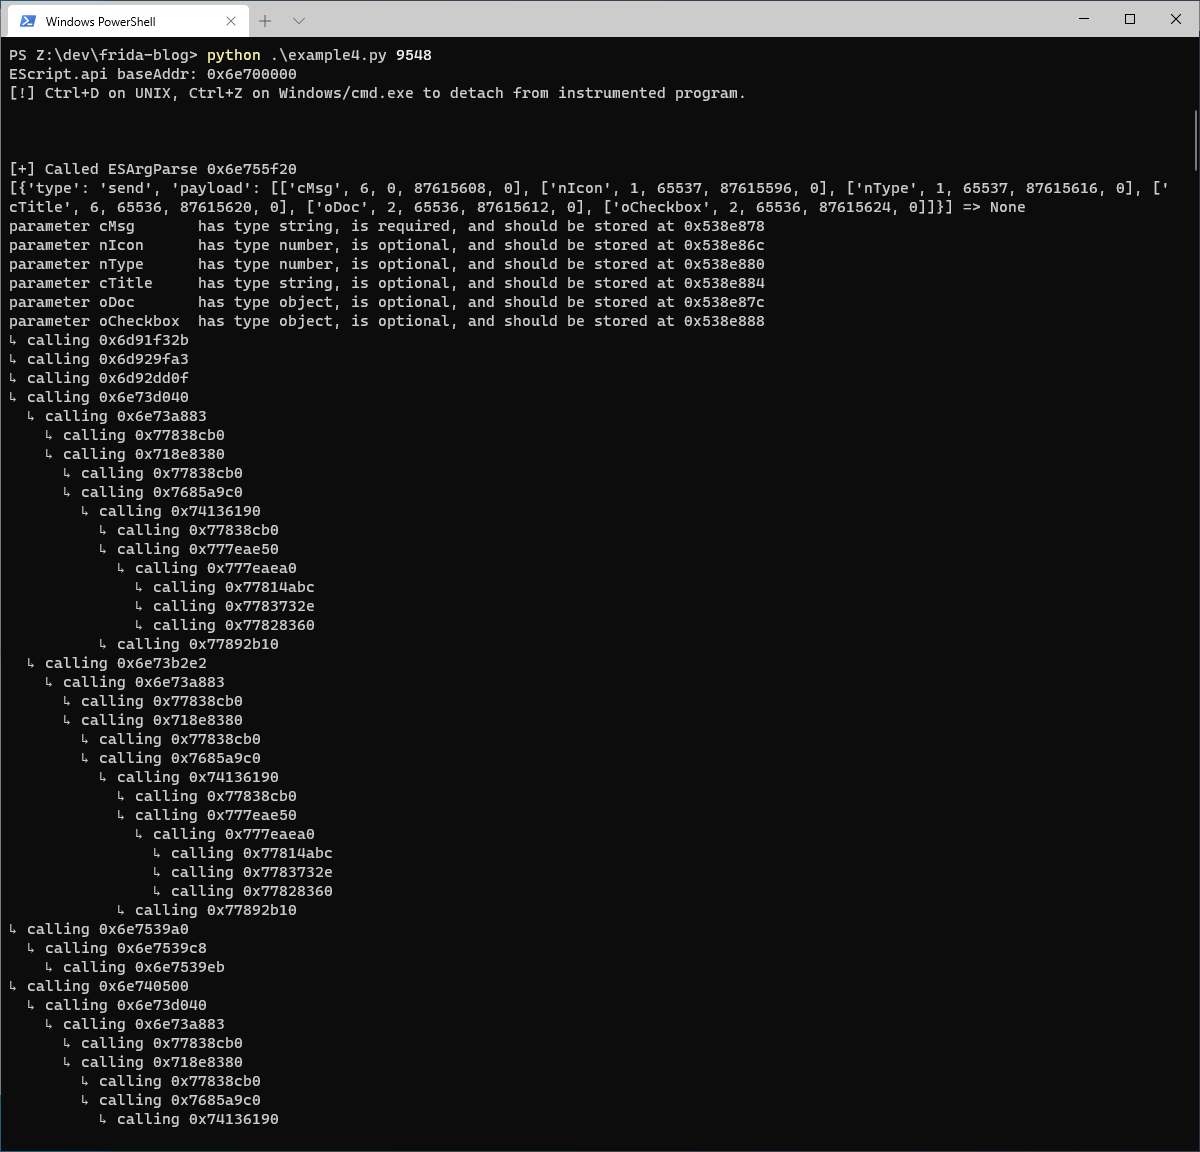
When running the code, we get a nice nested function callstack that can help us identify interesting functions and program logic visually:
Conclusion
In this post, we have gone through the basics of Frida including installation, function hooking, parameter manipulation, and cross process messaging, while also explaining some of the internal architectural ideas. In addition, we also took a quick look at the powerful builtin code tracer Stalker and what it can offer. Throughout the post, relevant examples are presented alongside the various concepts suggesting some ideas of how Frida can be used.
Lastly, here’s a table comparing Frida with other tools and showing how it’s a good middle ground between traditional debugger scripting and other dynamic binary instrumentation frameworks:
| Frida | Traditional debugger scripting (e.g. pykd, winappdbg) | DBI frameworks (e.g. DynamoRIO, PIN) | |
|---|---|---|---|
| high level language scripting | ✔ | ✔ | |
| fast code tracing | ✔ | ✔ | |
| dynamic code recompilation | ✔ | ✔ | |
| single language interface | ✔ | ✔ | |
| easy to setup | ✔ | ✔ |
I hope this post will inspire you, the reader, to give Frida a try and see how it can benefit your workflow.